Hello everybody, welcome to the Devine Escapes Stone Arts Academy. My name is Devin Devine, and today I wanted to talk to you about a little known method for splitting stones.
This is a technique I’ve been developing over the past few years, using small masonry cut-nails, which are little steel wedges, to split boulders and cut stones in a variety of shapes and sizes. I probably first attempted this a good 7 years ago or so, and had the idea originally a few years before that. Anyway, past few years I’ve been using the technique a lot. At this point, I’ve cut cut slabs, blocks and boulders of all sizes using just small masonry cut-nails.
Why use cut nails for splitting boulders?
- Because the concrete saw/chop saw is loud and dusty
- Similar to using feather and wedge, but cut nails only require a much smaller hole be drilled, saving you big on TIME and expensive masonry bits
- It’s much faster, compared to cutting using the saw.
Related content: how to cut flagstone using a hammer
Splitting stone using cut-nails, video demonstration:
Cutting stone this way, using cut-nails…seems so obvious. How come no one else seems to be doing it? It’s all feather and wedges….but then also, you see that guy who makes short videos of himself splitting giant boulders in Africa or some place, really large impressive boulders, using just small wedges and a sledge hammer. Apparently not feather and wedges, just wedges. Anyway, it’s an old idea and there are many traditions of splitting boulders using a series of drilled holes. You hear legends of other hole-drill methods, involving ice, or wood that gets dripped on and expands, but what you see is feather and wedges aka wedges and shims.
So anyway, here I forgot my feather and wedge set and forgot my mini sledge hammer…
this is not a problem, not for your trusty-dusty, handy-dandy, friendly neighborhood stone guy ™
A top secret technique I’ve been developing for years. My gift, to you. Use it well and tell no one, or if you do tell, let ’em know where you learnt it from. Cut nails require smaller holes. This saves money on larger drill bits and saves time, as larger drill bits go down slower.
more related content
- consultation services, teaching stone work by the hour
- building a natural stone bird bath
- how to move heavy stones without machinery
- how to split a boulder using feather and wedge
How to use this method
- Draw your cut line. Mark your line with stitch marks, every 5 or 6 inches or so, depending.
- Start each hole. At each stitch mark, drill down just an 1/8″ of an inch or so. Once you start drilling, water and dust may likely wash off your soapstone line. To avoid having to re-draw, what you do is you begin each hole, before fully drilling any of them.
- Drill each hole one at a time. You’ll want to be using an SDS type hammer drill. You’ll also want to have a 5 gallon bucket of water handy with a grout sponge. This allows you to dribble water on to the drill bit as you’re drilling. This reduces dust and extends the life of the drill bit by keeping it cool.
- Seat each cut nail, setting them perpendicular in relation to your cut line.
- Use a 3 pound mini-sledge to drive the nails down, one tap for each nail. Doink, dink, dank, dunk…..pop!
- Feel good about yourself, for you have just cut stone. Similar methods have been used for thousands of years. Temples and pyramids have been built using similar techniques and you are part of that long tradition now. Feels good, right?
cut-nails also works for splitting thin stone slabs
I originally conceived of this method because I was looking for a way to cut thin stone using feather and wedges. The problem was that feather and wedge sets are too thick for splitting 1.5″ thick stone.
The cut nail method is not meant to replace feather and wedge. But rather it supplements feather and wedges, a complimentary technique that works better on small stones, although it certainly can be used to split larger stones, as demonstrated above.

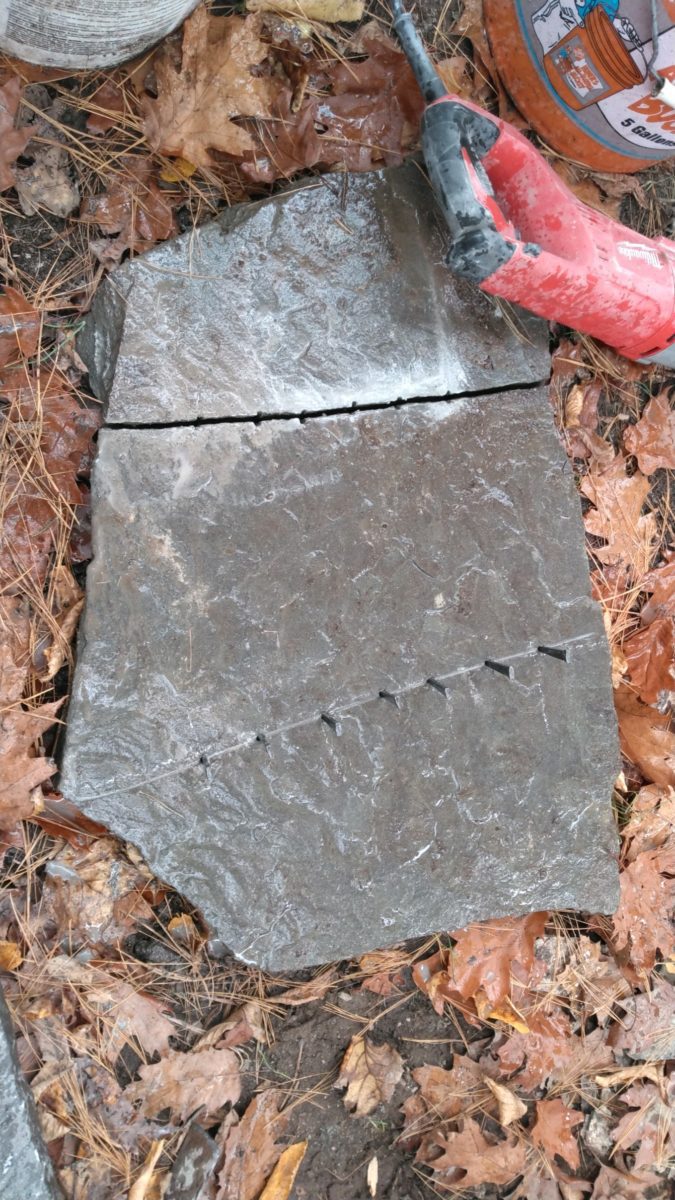
Pennsylvania blue flagstone, with holes drilled in straight line, for splitting. 1/8″ holes are drilled about 4″ apart.

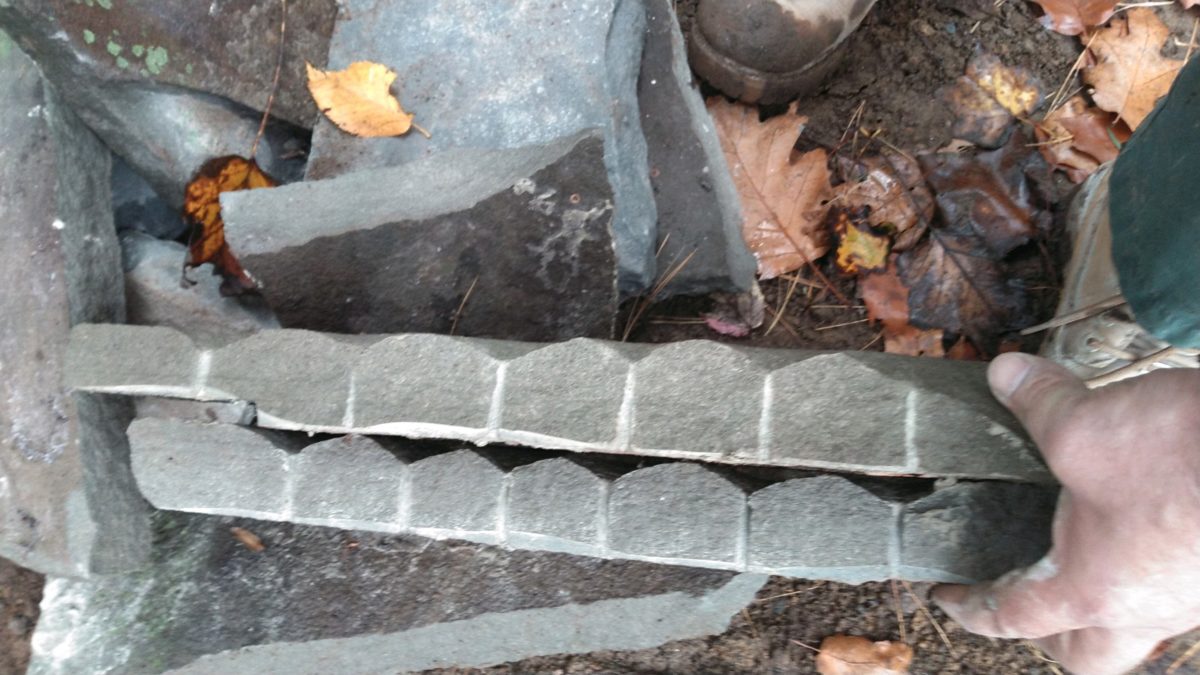
The same stone–showing the cut-out after it’s been split
thank you

Hi Devin,
I found you when trying to figure out the history of this slab (broken in two) which we found below the concrete floor of a Michigan basement (concrete floor put in 1950). I am sendinga few morepicturesto your email.
Feel free to post them.
https://www.devineescapes.com/wp-content/uploads/2024/04/20240427_100712-scaled.jpg
https://www.devineescapes.com/wp-content/uploads/2024/04/20240427_100828-scaled.jpg
https://www.devineescapes.com/wp-content/uploads/2024/04/20240427_100343-scaled.jpg
You figured out how to do that using cut nails, I guess. I became familiar with those nails as this 165 year old farmhouse was deconstructed. I have attached the link if you are interested.
https://mahsmi.org/dtp
How did they used to do it and what would these have been used for?
I would appreciate any insight you can offer.
Thanks,
Sybil
Sybil,
This seems to me like a stone that broke by accident. Could have been a flagstone. They might have been cutting it to shape, by using a similar technique to the way I knap flagstone:
https://www.devineescapes.com/how-to-cut-flagstone-using-a-hammer/
Perhaps they were trimming a flagstone to fit somewhere–and it broke on them. Later on, they used it as fill, for beneath a foundation. Often, stones break on me, and then they get used as fill, like that, often on a completely different jobsite, months later.
That’s about the best guess hypothesis I have. Stepping stone, or flagstone, that broke by being dropped, or that broke while they were hammering on it.
Devin,
Thanks so much for the detailed response. I watched the video – really helpful, though this rock seems to have been formed as one piece, somehow). I have a bit of knowledge of geology and just looked up flagstone, shale and slate. I have geologist friends and will get someone to look at it. The patterns evident on both sides are very interesting. Like water or something etched into the stone.
I will let you know if I learn anything else. Please share any other thoughts.
Thanks,
Sybil