Devin Devine, artist and stone mason
phone consultation services
DIY hardscape/masonry/flagstone help rates:
$123.00 for one hour
$80 for a half hour
Monies are payable via Venmo, paypal or zelle.
Some of these techniques for moving heavy stones are ancient. Most of them are. Yet we’re still learning and adapting, day by day. We might split a boulder in half using the ancient feather and wedge method. Next, we might move that big split boulder using the ancient pipe conveyor method. We could be building dry stone walls, or steps, or stone pathways using these methods. And we do! All the time you guys, all the time. But if we had to build a pyramid, or a Stonehenge, then some of the methods described below would surely be employed.
A note on safety: Stones are heavy, and not famous for being soft. On to the techniques, tips and secret tricks of the trade!
Related Content: JOBSITE SAFETY
1. Walk large stones
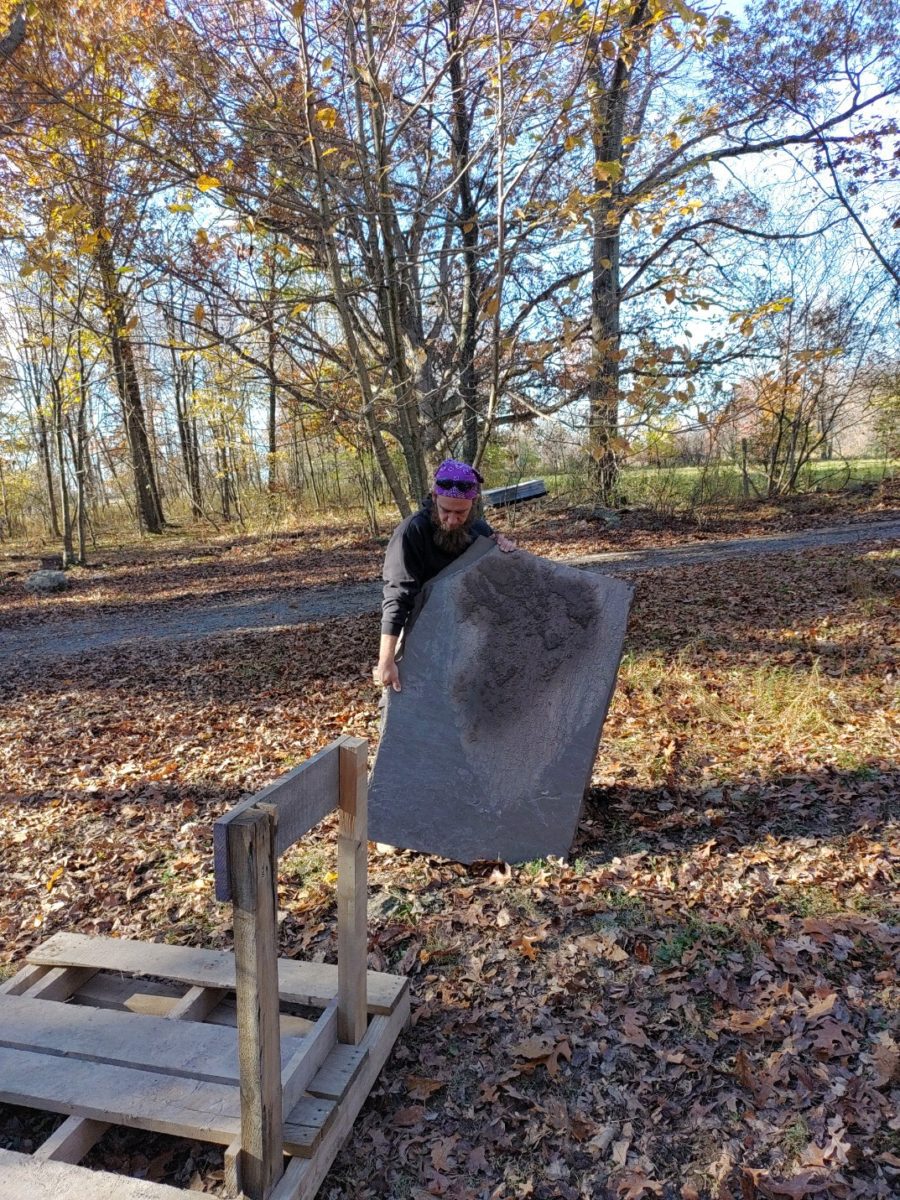
Stand large slabs upright and walk it–corner to corner. This one’s obvious, I believe, but when you first see a pallet of large stand-up flagstone you might stare at it and go, “duh…they’re too big for me”. I’ve seen it happen with new guys, often. But you can move them, they are not too big. You can walk them. This method is similar to the wheel method. With the wheel method, you stand up the slab and roll it–as if it were circular shaped. Often, we’ll end up walking a large slab of stone maybe 10′ or so, and then we may need to wheel it for the last few feet, to get over and around an obstacle, or something.
The wheel method isn’t getting its own listing here. It is considered just a variation on the walking method, which is itself used much more often. Just stand the slab up and then pretend you are trying to invent the wheel, using an unlikely shape.
Related content: how to build a dry stone wall
2. The dolly
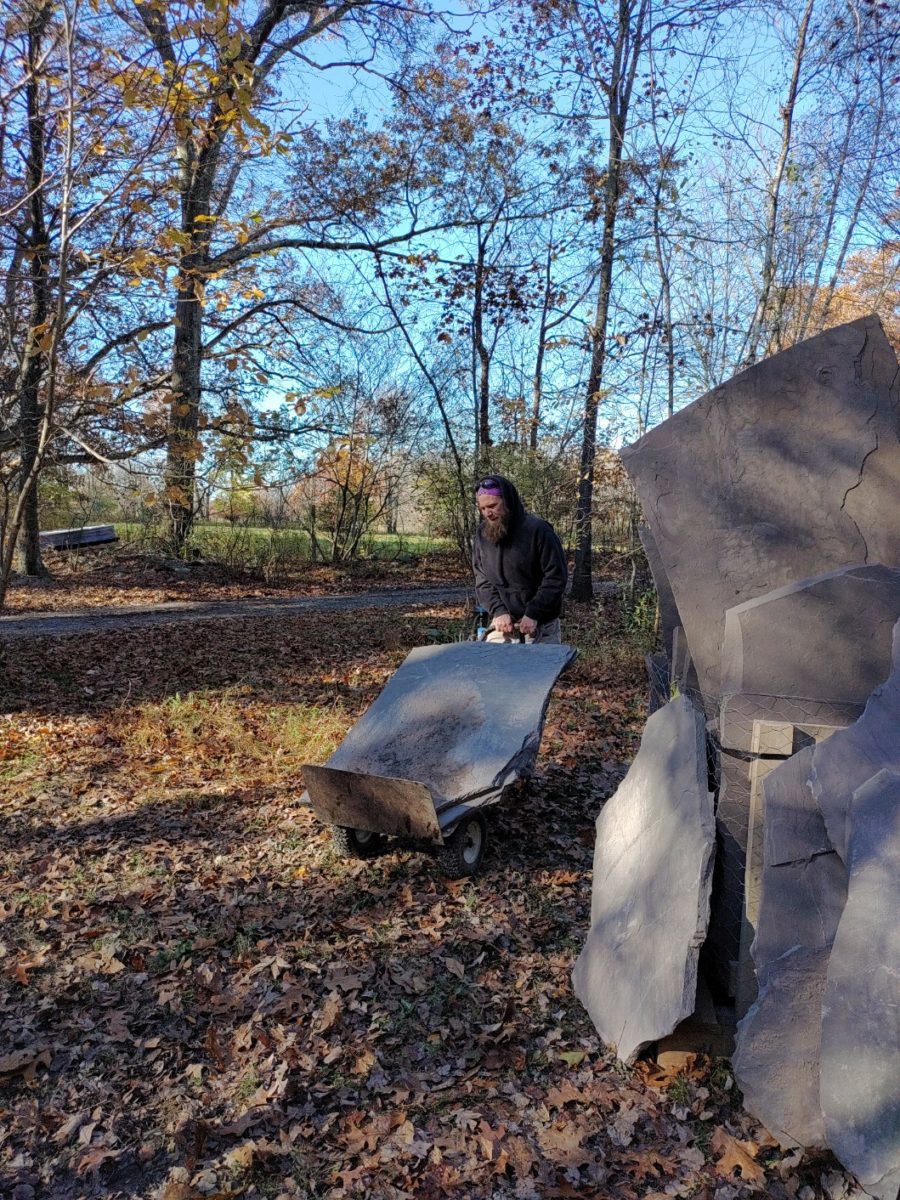
I’ve found it’s worthwhile to buy the largest and sturdiest dolly I can find. We’ve moved some heavy boulders, with that dolly.
3. Create a pivot point
Pry up that stone. By the way, when I say “pry” what I mean is take the blade end of your mattock and jam it under that stone. Secondly turn that mattock on its side. Usually you don’t want to pull the mattock back, for it may break, but turn it to its side/lay it down. Now that stone is up, a little bit you can slide a rock under there right at the edge of that stone and pull the mattock (or other pry tool) out. Next, now that the stone is up a bit, you can slide a different rock into the middle of that big stone. After that, you can pry up again with the mattock–and pull out that first rock from the stone’s edge. Now, your heavy stone is situated with a pivot point at the center.
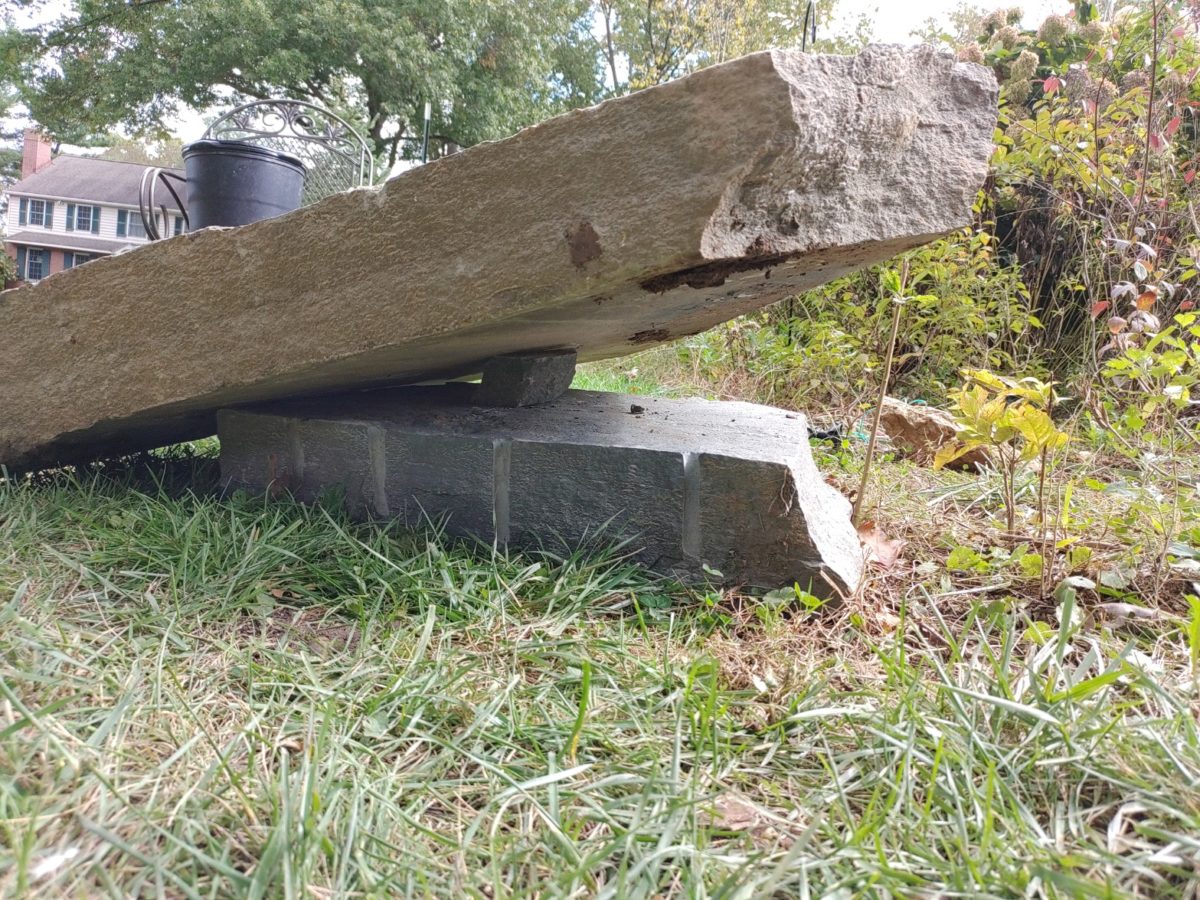
So we’ve created a lever. A see-saw. From here, you can easily spin a very heavy stone, and turn it 180 degrees if you want to. Or, you can see-saw one side up higher, and place a larger pivot stone under there–now, you can see-saw it even higher.
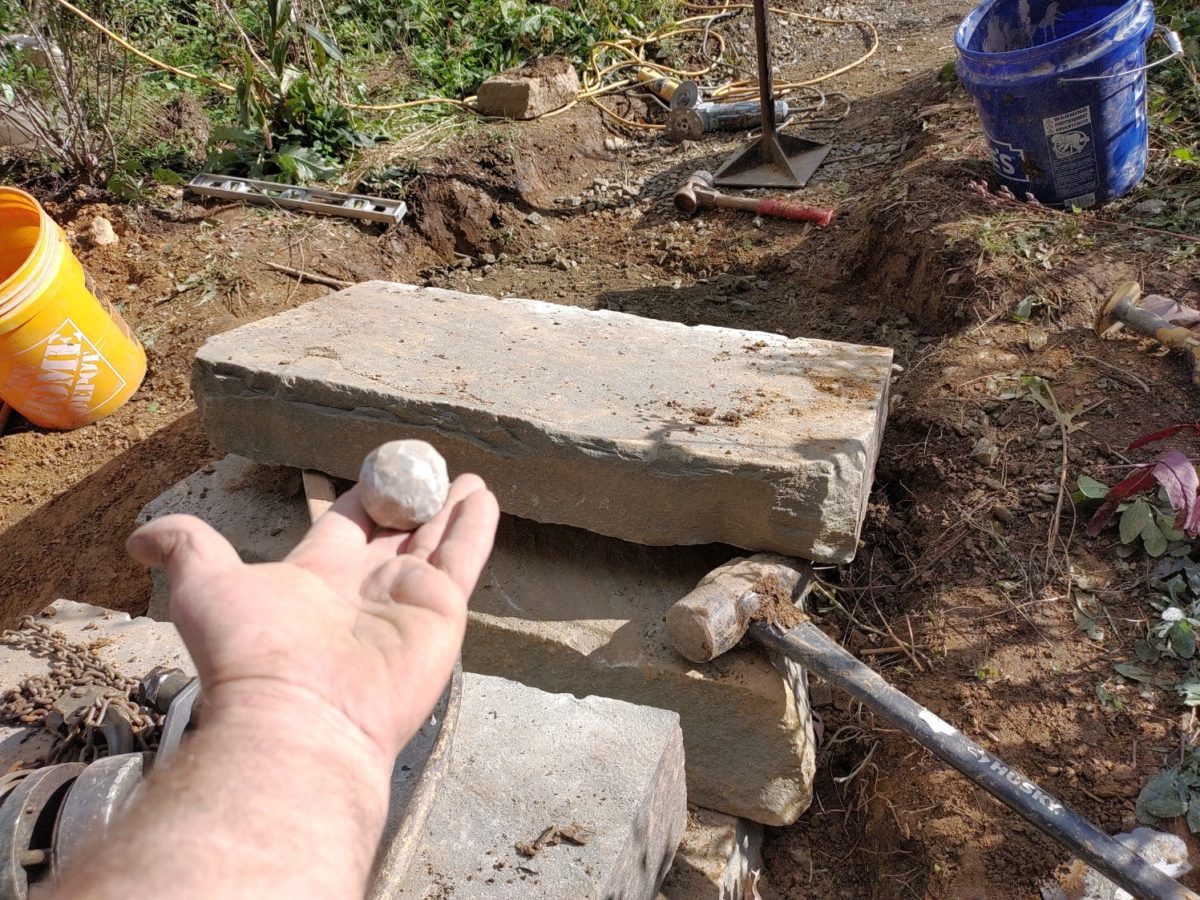
To make spinning the heavy stone easier, I usually keep a stone ball or two on hand. A 2″ chunk of gravel will do the trick, but a 1 or 2″ ball of stone placed underneath a big heavy stone will make spinning it around much smoother.
Now taking pre-orders for the 2025 Stone Art Calendar CLICK HERE or scan the QR code below:

New video:
4. Moving heavy stones using rollers
Pry up the stone and slide a steel pipe underneath it. Then another, and a third. Now you can roll that bad boy. Either push the thing, or take a rope, tow strap or what-have-you and pull it.
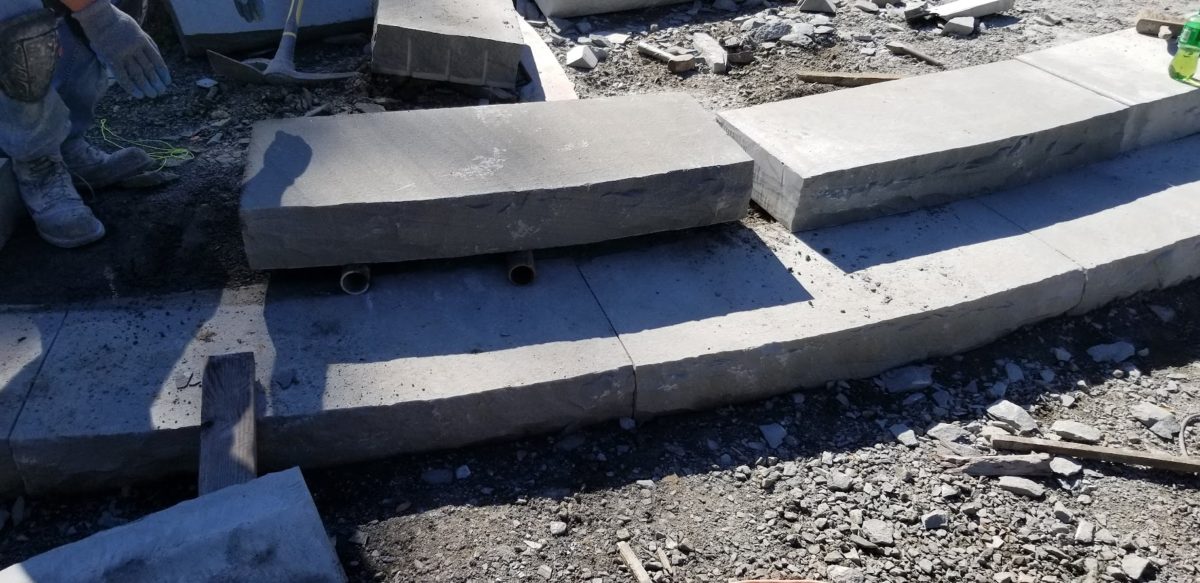
So in this photo we used only two rollers.
5. How to lift a heavy stone off the ground when it seems just a bit too heavy
Often a worker will point to a heavy stone and say something to me like “hey, can you give me a hand”. Well, if the stone is so heavy that the two of us will both be struggling–then it is safer for me to just lift it alone. Two guys may not communicate perfectly. Or, what if your partner slips? Nope! Here’s how it’s done:
Stand that stone up right, then roll it up on top of another stone. Now, you’re already off the ground, a bit. Stand that stone upright again… Now lean that stone over your thigh… Balance it across your leg and look at you now–that heavy stone is completely off the ground! Once I’ve got a stone balanced across my thigh like that, the next step is usually to get my hands under it and heft the thing up to my waist in one movement. Next it’s up into the bed of a truck, or unto a wall, in another movement.
*note to self, add some illustrations for #5
6. How to flip over a stone that is too heavy to lift
First, pry that stone off the ground an inch or so, using a pick axe or pick mattock, and slide a small stone under there while it’s an inch or so up. Now, you have a start and now it will be easier to get a pry tool in there and get it up higher. I might reach for the mattock again, or if the piece is heavier maybe we’ll go with the digging bar. Pry the stone up like 4 or 7 inches high now–and slide a bigger rock under there. Now, that heavy stone is already halfway stood up. At this stage I’ll put the tool down and just lift that stone all the way into a standing up position. Now that it’s standing up, we can get it on to a dolly and wheel the thing across the jobsite.
Or, we can lay out a chain on the ground and flop the stone on top of that chain. Now, we can wrap it up in that chain and lift it off the ground using a gantry crane.
Short video, demonstrating methods #2 and #6:
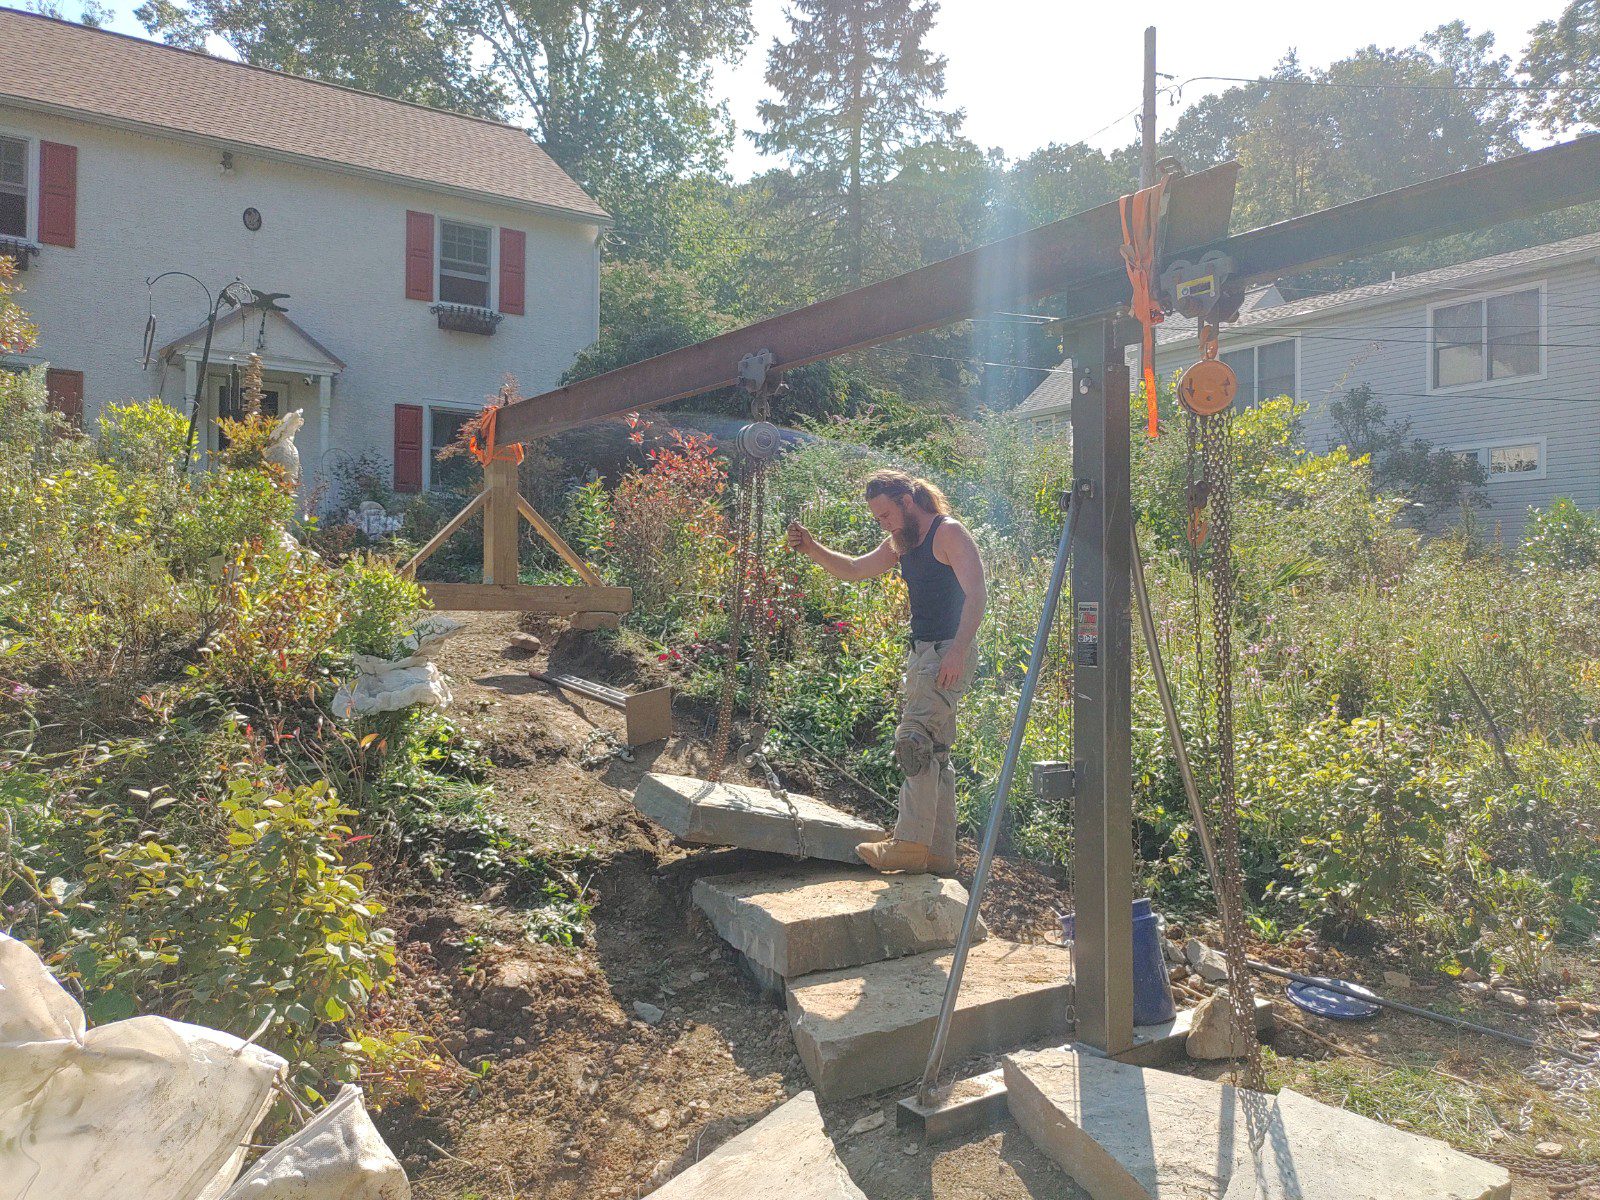
7. Invest in a gantry crane, crane trolley and chain hoist.
related article, building a dry stone wall from large stones using a gantry crane
Oh, I had this idea for a decade before actually enacting it. Can’t say I regret waiting though because the ten years of not having that crane gave me plenty of opportunities to develop the other techniques described above.
If you find this content helpful you can help support this website by commenting below, by sharing on social media and by subscribing to this blog
What did I forget?
Surely, there’s some vital, important technique I neglected to mention–let us know, in the comments below.
Related articles
- If it’s heavy–put a handle on it! My review for the grabo tool
- how to build a dry stone wall
- how to cut flagstone using a hammer
The methods described here are ones that I’ve been developing for decades now. And still learning, adding new tricks, modifying old tricks, all the time. When I started my business in 2007 I didn’t know half these tricks–and the ones I did know I didn’t understand as well as I do now. One good piece of advice an old head gave me when I was starting out was “pay attention to what the older laborers do, how they lift things”. And it’s true. A young laborer doesn’t have the experience. An older mechanic. or skilled guy, mason, foreman, whatever–he hasn’t been laboring this whole time. So pay attention to the older guys who have been doing the heavy lifting year after year, to older laborers–they’ve came up with easier ways to do things.
Notes on safety precautions
- If you have to grunt, you’re probably doing it wrong.
- Always stretch and hydrate. Take care of yourself, physically first.
- Don’t twist your back, while carrying a heavy weight.
- Don’t use your back, use your head! Okay, well a few of the methods here do involve using the back muscles a bit. (Actually, there was a safety inspector on our jobsite recently. He remarked that my workers and I have good body mechanics. Good to know!) Knees, arms, back, the whole body can take strain, doing this sort of work. It can barely be avoided–this is hard work. But you can always think, and usually you can come up with an easier way to move a stone. For example, you might say okay, this heavy stone needs to be moved, well I can just heft it up and toss it over there! But then again, is there an easier way, a way that will strain my body a bit less? if so, go with the less straining way! Look, I sell almost 100% of my jobs as flat-rate. The customer pays for the whole job, not by the hour or by the day. That means there’s motivation for me to get it done. But then again, in the long run–it’s much better for me if my employees and myself are in good shape. That 30 seconds that you might save by doing it a faster way will cost you hours later, when you’re aching and dragging.
Special thanks to Wally Walington,
Next, check out my stone art:
Donate via Venmo
Thank you
![]()
I can confirm that being new to the trade and contemplating movement of a 500 lb. piece of rock fills one with terror, but after unloading three pallets of 2″ flagstone without injury, I can attest to the legitimacy of this advice.
And yeah, I grunted on a few of them because I’m a noob, but like I said, I’m uninjured. It can be done.
Excellent. Thank you for commenting– and welcome to the trade. Stretch and hydrate!
Enjoyable ez read…. unusual. I am in a fix. Contractors left a boulder right in front of the steps they put in!! Halloween is coming. I need that humungous rock moved. Oh well. I’m 61 n not in great shape. idk. Gonna try a pry bar then maybe the roller thing n then mayb the dolly. I will have to buy all. The last will b the “come along” thingie. Went to home depot n was thankful for the honesty. Guy didn’t know but sent me to the aisle where I saw a mattock( now I know what to call it!) So ..in the right direction. Already smashed my thumb moving another smaller rock that they left on the slope! Almost went careening down the hill, if it hit a parked, I woulda been outta$$) That was in May and my nail is half renewed n the other half looks GROSS! And it hurt like the dickens! No feeling for many months. So why did they do it?? He wanted to redo my yard but gave me an 80 thou price. Too mas! Then he went down to 10 tho ( in California.. water restrictions, so artificial turf a go to) but my husband decided against the turf, so a no go) I never said yes. but, you’d think I did! ( I don’t drink, so am of clear mind!) Everything was left… the boards to mold the cement, slag all over the place and cement water dumped into my new patches of grass. smh Hey, my 1st time with a contractor! and last with that one. Took my hose too, lest I forget. Ok time to stop.. when I start talking about this I get upset again. On to moving that ROCK! Gonna put it under my pine tree! Not too far. Pretty flat. Wish me luck!
I am sorry to hear of your troubles. Messing up your yard wasn’t bad enough, they grabbed your hose! Forgive me, but I may have laughed when I read that. Ridiculous.
So I don’t want you to have to spend money needlessly on this situation, but if it were me, there’s a good chance that I’d split that stone in two, or in four, and then try moving it. Somewhat depends on the type of stone, and its size…is it hard/soft? Brittle? Full of cracks or fairly solid? If the stone is solid, then I might recommend splitting it with feathers and wedges, as described here: feather and wedge set.
the cost to do this: 1. Hammer drill, maybe $200 (this is the one I use) Or rent one, maybe $80 for a day. 2. A set of feather and wedges, maybe $30. I use these. 3. A 5/8″ sds plus masonry bit.
If you like, you can upload a photo of the boulder to imgur and share the link with me here, and I may be able to offer an opinion as to whether the feather and wedge will work. No promises though, can’t really tell for sure, just from a photo.
Reading over your drystack wall content. Thank you very much. I’m fairly obsessed with your information my wife would say hahah! Sooo good. Thank you!
I’m glad my writings are helping people–and thank you, your comment and donation via venmo are appreciated!
We have a couple of granite treads that were forklifted into our SUV. How would you suggest that we remove them, without crushing the bumper, and place them on the ground?
Thank you!
2″ or 6″? I need to know how thick/how heavy these treads are.
For 2″ thick treads, for stone treads that aren’t too too heavy…..I’d use a pry tool, get under the treads, then use a couple small pipes as rollers. Roll the tread till it’s part way out of the vehicle and have a helper there to catch the end of it, having them hold it half hanging out of the vehicle while you get in position to help carry it…
But for a 6″ tread, that isn’t going to work, it’s going to be too heavy. If I got this right and we’re talking about a 4′ long x 6″ thick x 12″ wide stone tread…..then I’d recommend hiring a forklift. Sure, there must be a way to do it, without a lift. But how complicated and unique to the situation is the solution going to be–how can I pass off instructions here that could be safety followed?
Remember how professional wrestling used to have that disclaimer: don’t you kids try this stuff out home, these men are trained professionals. What you’re asking seems tricky and dangerous, difficult to communicate. Me, I’m superbad–I’d pry that bad boy up, roll it till it’s hanging out of the truck…
…and go from there. Might just do a simple ramp, but with enough support pieces wedged in there so that not much weight would end up on the bumper, as you suv bumper isn’t going to be as sturdy as my trucks have.
If we couldn’t get a ramp set up in a way that will protect the tailgate, then I’d do something daring and crazy like building a temporary table-like structure just as high as the back of your truck sits. Roll that tread out of the truck and unto the table, get the vehicle out of the way, then bring the tread down from the table, probably in a bit of a controlled fall, possibly bringing the entire table down in such a controlled fall.
All of this requires strength and experience and is not too easily described by text, and would need to be engineered on the site anyway.
So what you probably want to do is this: pry that tread up using a wonder bar or similar pry tool, and get a 2 x 4 (or something) under there. Then get another one under there. Get the tread situated in such a way that you can get a forklift underneath it again–that is, if it’s not still nicely propped up on 2 x 4’s from when the tread was loaded.
In any case, have an extra set of hands and eyes there with you, take your time, and do things safe.
Devin, great blog. Have an interesting problem pool surround. We have a lot of tippy stones and ones that have dropped an inch. These are stones in a pool surround that was dry laid on sand by a master stone cutter with perhaps an 1/8 or a quarter inch joints for most of them. They are ranging from 8 -40 square feet and 4 inches or more in thickness
indiana ledgerock. At 160 lb per c foot !! They were not mortared to the pool bond just laid over it and hammer finished and caulked and I guess water and time have moved them. The caulk has failed and the tiles below it on the pool edge are falling off I have brought in contractors who just shake their heads. I looked at the idea of a gantry and I can put eyelets into them as they have pool cover screws cut into them already so whats a few more holes. Would eyelets be good enough for hoisting. Any other ideas ?
Can you post a photo? Only because this sounds like a unique installation, so I’d like to see it.
I’ve used the grabo before, in conjunction with a crane to set large heavy stones, but I believe grabo maxes out at around 250 pounds. Sure, two grabos can be used in conjunction, but even then, the smaller stones you have will be pushing the limit, weight-wise.
But then, they make pneumatic powered vacuum lifters. More expensive than battery powered units, they can apparently handle a lot more weight. I haven’t used them myself, so I can’t recommend a particular type.
Pry bars. A helper. Get the stone up an inch higher than its neighbor–and place a wedge in there. (Don’t try this at home! But it’s how I’d do it) Then pry up on the other side of the stone, get another couple wedges in there. Use the pry bar to lift the stone now and get it pried up enough to place something under it, keeping it 12″ or so off the ground….then, now that it’s pried and resting 12″ up–we can get under it and stand the thing up. Once we have it standing, my helper just holds the stone for a few minutes, while I adjust the stone dust. Lowering the slab now will be a careful maneuver…..but we get a couple full length 2 x 4s and use them to lower the stone, laying it back down into the hole with the 2 x’s sticking out. Now pry up on the slab while your helper pulls out the 2 x’s.
I wouldn’t shake my head at it and walk away–I’d probably do just like I described. But I’m not saying it would be easy! In fact, the last paragraph describing my method may be a bit unclear. I could draw pictures, but then, do I really want home owners trying out daring maneuvers like I just described?
Upload a photo to imgur and get me the link, or just email me a photo to devin@devineescapes.com
Hello, I have inherited a stone water feature at our house, which looks like it was being repaired. It is about 5 feet long and very heavy – much more so between the middle and bottom as it is concreted to a paving slab at its base with additional smaller stones. I want to get it back upright from its current lying position but have failed miserably so far. Any ideas would be welcomed!
If you could post a photo I probably could. Upload it to imgur or someplace and post the link here.
Hi, thanks for the reply. I attach the link (3 pictures). Many thanks in advance for any help you may be able to provide.
https://imgur.com/a/pB0DrOB
Cool. I’m still working right now, but will put together a description for you, of how I would stand this water feature back up, tonight.
Much appreciated and thanks very much.
Okay. First of all take your time and exercise caution. I believe the piece in question weighs about 5 hundred pounds. Hard to tell exactly from the photos, but it looks like more than 400, less than 800 pounds.
If it were me I would have with me 2 digging bars, one pick axe/pick maddock, and 1 or possibly 2 helpers:
1. Get a pry bar under there and lift up the top end of the water feature, prying it up a couple inches–then have your helper place a fist size rack under there.
So far, everything is pretty easy. But if you’re having to strain and grunt at every one of these steps, then maybe a crane is a better and safer bet. Remember, I’m telling you how me and my crew would handle this, and we have a lot of experience with this sort of thing. I’m not responsible if you get hurt–but please, do not get hurt!
2. Pry up again–getting the top end of it maybe 10″ off the ground by now. Helper places another stone–towards the middle/a couple inches closer to the top end.
3. Repeat, this time leaving it so the top end of the water feature is maybe 18″ off of the ground, with maybe a 10″ stone placed underneath it, near the middle….
4. Now, when you get under there with the pry bar, you’re already at a good start. I’d have my helper spotting me as I pry it all the way up, possibly 2 helpers spotting or 1 of them using the second digging bar.
Possibly, there may need to be more steps. It depends how heavy it is. If it’s really heavy, then we might just being a couple inches each lift. The important thing then, is to be leaving the part-way lifted item in a steady state, in between lifts. So bracing it really well with a well placed stone and/or even wooden framework, at each step.
One big concern though is that I’d be worried about the mortar and smaller stone coming lose, during the process. Of course, I’m a mason, so that’d be no problem for me. I’d have some type s mortar on hand, just in case, and a small diamond trowel.
Of course, I own a crane….but if the digging bar method proves to unstable, or the stone fountain piece too heavy–then I might build a make-shift crane. 6 x 6 limber and two A-frames. An I-beam (or 6 x 6 if founds are low. If so–have some diagonal bracing between the A-frame and the top 6 x 6) spanning the space between the two A-frames. A come along hanging from the I-beam. The come-along would work, it’d do the trick–but of course, having a chain hoist and a trolley hanging from that I-beam would make the process a lot easier.
Come along at amazon:
Chain hoist: https://amzn.to/3ErJFia
Trolley: https://amzn.to/3EupPCX
The same products can be found, for similar prices, at harbor freight. I-beam, trolley and hoist won’t be free….but then again, with a 6 x 6 and a come along, you’re not saving much money.
I hope that helps. I don’t mean to discourage you from the task, but I gotta give warnings, because I won’t be there to supervise the situation.
Hey, let me know how it goes, especially if you have a big success!
Thanks for taking the time. Really appreciate it. I will give it a go next weekend.
Did you get the water feature moved, and did you end up building a crane to do it?
Wow, this post is so helpful! Thanks Devin. I’m in the process of DIYing a flagstone patio (with your awesome phone consultation help) and what I learned here about walking the stone and moving it via the pivot point have been super helpful. My back thanks you. I love the safety precautions reminder too. I had, actually, initially thought that this project would be all grunt work since some of the stones probably weigh more than half of what I do. But I have been using the strategies you describe here and so far so good. I’ve got to remember to stretch and hydrate a bit more though, thanks for the reminder. And thanks for all your assistance, both in the information you so generously share here in all your blog posts and with the phone consultation.